
Hello!
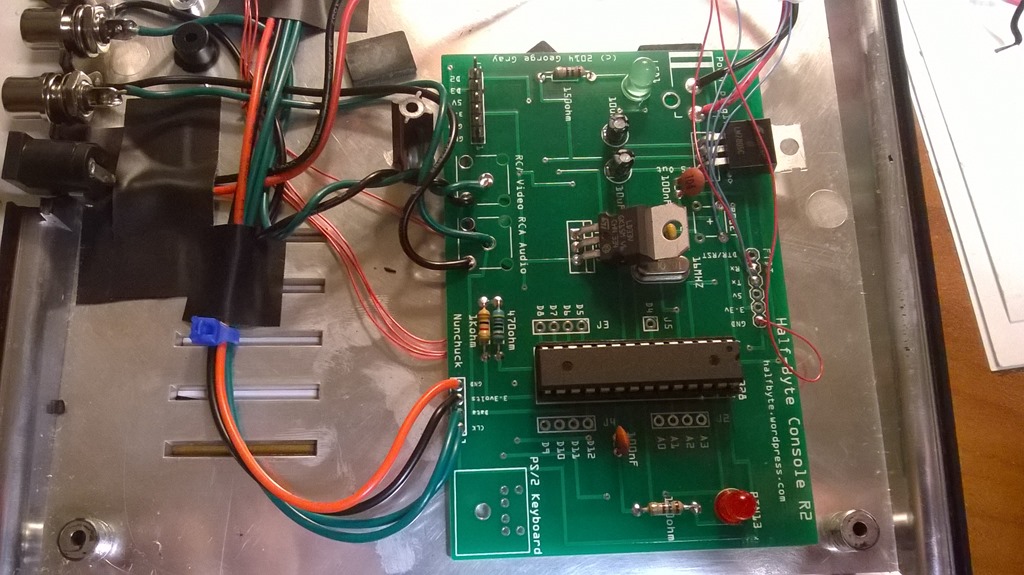
Not sure if this is the right place, but I wanted to share a little project I did. I have been building little Arduino based computers for almost a year. My latest project involved cramming one in a TS1000 shell. I plan to interface the membrane to another Arduino ( a pro mini, maybe) and connect that to the main Arduino running Tiny Basic, similar in spirit our favorite little computer. I was a big fan of the ZX-81, built one from a kit. Loved that little box and had several of them, as well as a bevy of TS1000 and a 1500. Later, I had 128 and the 2068. Unfortunately, I no longer have them.
Ultimately, I would love to have an lcd panel in a Sinclair Flat Screen TV style case, mated to my faux TS1000.
When started looking for the shell, I was surprised to find such a vibrant community around the Sinclair line. I knew they were popular, but had no idea it still lived to this extent. Even down to being able to buy brand new kits and look alikes. And new software too. You guys rock!
Here's a URL to my post.http://halfbyteblog.wordpress.com/2014/ ... e-console/
TS1000 a new life
TS1000 a new life
Last edited by geogray on Thu Jul 10, 2014 8:16 pm, edited 1 time in total.
Re: TS1000 a new life
Hi there, I'm fascinated to see that your TS1000 appears to have metal shielding inside. I'm pretty sure the ZX81 in the UK didn't have that!
Re: TS1000 a new life
The metal shielding was added to the US version of the ZX81 in order to comply with FCC radio interference regulations.
It also appears on the US version of the Sinclair QL - not sure about the Spectrum .....
It also appears on the US version of the Sinclair QL - not sure about the Spectrum .....
Rich Mellor
RWAP Software
RWAP Adventures
SellMyRetro
Retro-Printer Module
Also Involved in:
Icephorm
RWAP Software
RWAP Adventures
SellMyRetro
Retro-Printer Module
Also Involved in:
Icephorm
Re: TS1000 a new life
hello!
It's not really metal either. Some kind of coating over the plastic. When I was trimming the edge for the Wii Nunchuck connector, I just used a cheap X-Acto knife. Took zero effort to cut and trim. When the filings came off, you could see the very thin metallic coating. Looks like a type of paint. And, it was used to satisfy the Communications Commission's concern over RFI.
It's not really metal either. Some kind of coating over the plastic. When I was trimming the edge for the Wii Nunchuck connector, I just used a cheap X-Acto knife. Took zero effort to cut and trim. When the filings came off, you could see the very thin metallic coating. Looks like a type of paint. And, it was used to satisfy the Communications Commission's concern over RFI.
Re: TS1000 a new life
As stringent as the FCC were (compared to the UK authorities), I do think that they had a point..
I remember having a problem with a ZX Spectrum output - and had the top off the TV modulator whilst I was testing it - my video recorder was recording a TV programme which I wanted to watch - now despite the lack of any connection between the Spectrum and the video recorder, yep, it managed to record an hour or so of me using the Spectrum....
I remember having a problem with a ZX Spectrum output - and had the top off the TV modulator whilst I was testing it - my video recorder was recording a TV programme which I wanted to watch - now despite the lack of any connection between the Spectrum and the video recorder, yep, it managed to record an hour or so of me using the Spectrum....
Rich Mellor
RWAP Software
RWAP Adventures
SellMyRetro
Retro-Printer Module
Also Involved in:
Icephorm
RWAP Software
RWAP Adventures
SellMyRetro
Retro-Printer Module
Also Involved in:
Icephorm

Re: TS1000 a new life
Sinclair always used cheap solutions - the 16k ram pack is just plastic metallized at the inner side (maybe a kind of spray).
I don't know if it has been available in the 80ies but could be maybe a piece of milk tetrapack packed inside the spectrum.
I don't know if it has been available in the 80ies but could be maybe a piece of milk tetrapack packed inside the spectrum.
Re: TS1000 a new life
No, the tetrapak carton of milk was usually placed on top of the '81 to cool the thing 
B
B
Re: TS1000 a new life
After many googling time on the internet I found Ted Foolery pages on a solution :
http://www.tedfoolery.com/timex/
Thank you Ted for this very good example.
With Ted idea, I wanted to replace the Basicstamp used with a cheaper microcontroler, I wanted to use my PC keyboard and I wanted to have the possibility to "load" some program into the TS1000.
My solution : Use a Arduino microcontroler linked to the Keyboard connector on the motherboard of the TS1000, and use the USB link to connect to my PC (and use my PC's keyboard). I do not think the arduino model is very important, my 1st test was done with a Arduino Pro mini with a FTDI adaptor to connect to USB. A arduino nano should work too. To find the keyboard connectors on the TS1000 is really easy : there are 2 connectors, one with 8 slots, one with 5, side by side. To enable me to close the TS1000 casing, I used 90 degree pinheads soldered to flat cables. The flat cables can go thru the TS1000 back end hole, even with the board connected.
I am using port D2 to D13 and ports A0 and A0 on the Arduino. The analog port are used as digital ports
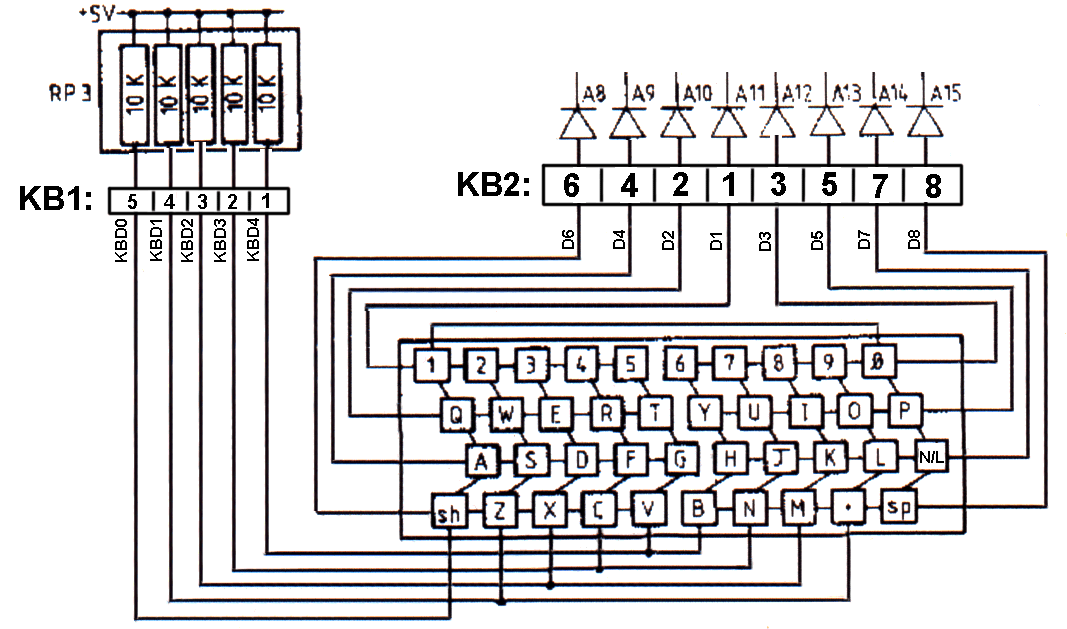
The Timex Sinclair 1000 uses a 5 X 8 matrix to map the 40 keys of the keyboard. You map a row and column to determine which key have been pressed. The matrix is connected to the adress bus and data bus of the TS 1000.
You can find the matrix picture at
http://fetrmartin.free.fr/ZX81/zx81_imp8B.gif
To "simulate" a pressed key, you just have to cross a row and a column for a few milliseconds. The transistors are the contact points between the row and the columns. To press a key, you just enable to right transistors, and it works. The arduino can drive the trasistors easily, it does have USB serial links, I just had to plug it all together.
How it all work: a very simple VB program runs on the PC to capture which key is pressed on my PC keyboard. the VB program send the ASCII key to the arduino via the USB serial link. In my case COM5: was used. On the arduino, you scan the usb serial link and use a table to map the ASCII character with the corresponding row / colums you will have to hit. example : the character "p" is ASCII 112, it correspond to row 0 column 5, then I just have to put the line ROW column to HIGH to fire the transistors to press the key on the TS1000. For the uppercase characters, I added 50 to the row column correspondance.
For the ENTER key, the "Enter" button the the PC can be used, but the "<" also, because I can use the">" as the uppercase Enter. The <> characters are located just left of the "enter" key on the french canadian keyboard. Many characters are mapped to 0 on the table, this allorw me to disregard unwanted key pressed but they could be use for other purpose.
On the VB program, I added a button to send a "program" to the TS1000 thru a text file. Attention, it is not .P file. It is a text file that would correspond to the key pressed to the keyboard. As an example : to have the TS1000 have the line : 10 PRINT "MARCEL", the text file will have : 10pPmarcelP :thoses are the key pressed to enter the program.
I have included the on the Facebook page the arduino code, the VB cose , the diagram of the components and the picture on the TS1000 hooked.
From the TS1000 backplane, I used the ground signal, nothing else. I will progably add a "power ON/OFF" button and a red LED power ON indicator.
Hope this can be usefull !
see my facebook : Timex Sinclair et commodore 64 et raspberry pi et arduino
Marcel Racine
Longueuil
http://www.tedfoolery.com/timex/
Thank you Ted for this very good example.
With Ted idea, I wanted to replace the Basicstamp used with a cheaper microcontroler, I wanted to use my PC keyboard and I wanted to have the possibility to "load" some program into the TS1000.
My solution : Use a Arduino microcontroler linked to the Keyboard connector on the motherboard of the TS1000, and use the USB link to connect to my PC (and use my PC's keyboard). I do not think the arduino model is very important, my 1st test was done with a Arduino Pro mini with a FTDI adaptor to connect to USB. A arduino nano should work too. To find the keyboard connectors on the TS1000 is really easy : there are 2 connectors, one with 8 slots, one with 5, side by side. To enable me to close the TS1000 casing, I used 90 degree pinheads soldered to flat cables. The flat cables can go thru the TS1000 back end hole, even with the board connected.
I am using port D2 to D13 and ports A0 and A0 on the Arduino. The analog port are used as digital ports
The Timex Sinclair 1000 uses a 5 X 8 matrix to map the 40 keys of the keyboard. You map a row and column to determine which key have been pressed. The matrix is connected to the adress bus and data bus of the TS 1000.
You can find the matrix picture at
http://fetrmartin.free.fr/ZX81/zx81_imp8B.gif
To "simulate" a pressed key, you just have to cross a row and a column for a few milliseconds. The transistors are the contact points between the row and the columns. To press a key, you just enable to right transistors, and it works. The arduino can drive the trasistors easily, it does have USB serial links, I just had to plug it all together.
How it all work: a very simple VB program runs on the PC to capture which key is pressed on my PC keyboard. the VB program send the ASCII key to the arduino via the USB serial link. In my case COM5: was used. On the arduino, you scan the usb serial link and use a table to map the ASCII character with the corresponding row / colums you will have to hit. example : the character "p" is ASCII 112, it correspond to row 0 column 5, then I just have to put the line ROW column to HIGH to fire the transistors to press the key on the TS1000. For the uppercase characters, I added 50 to the row column correspondance.
For the ENTER key, the "Enter" button the the PC can be used, but the "<" also, because I can use the">" as the uppercase Enter. The <> characters are located just left of the "enter" key on the french canadian keyboard. Many characters are mapped to 0 on the table, this allorw me to disregard unwanted key pressed but they could be use for other purpose.
On the VB program, I added a button to send a "program" to the TS1000 thru a text file. Attention, it is not .P file. It is a text file that would correspond to the key pressed to the keyboard. As an example : to have the TS1000 have the line : 10 PRINT "MARCEL", the text file will have : 10pPmarcelP :thoses are the key pressed to enter the program.
I have included the on the Facebook page the arduino code, the VB cose , the diagram of the components and the picture on the TS1000 hooked.
From the TS1000 backplane, I used the ground signal, nothing else. I will progably add a "power ON/OFF" button and a red LED power ON indicator.
Hope this can be usefull !
see my facebook : Timex Sinclair et commodore 64 et raspberry pi et arduino
Marcel Racine
Longueuil